Vue application
A few weeks ago, we completed the introduction part of Vue basics.
- Introduction to Vue.js (part 1)
- Introduction to Vue.js (part 2)
- Introduction to Vue.js (part 3)
- Introduction to Vue.js (part 4)
As I promised, we would implement a basic Vue application. Our work will be a one-page app. In the first step, we are going to use the Vue-Router and lay down the structure of the application. Later, we will add some CSS style, to design the interface of the app and grab API data - with Axios - and load it to our website. But today we will only implement the bare-bone structure of the web page.
The configuration of my environment:
The app we are going to make should be cross-platform compatible, but I would like to list the settings of my environment because sometimes there can be small differences in the installation process. The following list can be helpful as an indicator.
- NODE v6.10.2
- NPM 5.4.1
- Windows 8.1 Pro
Initialize the Application:
So let's start with
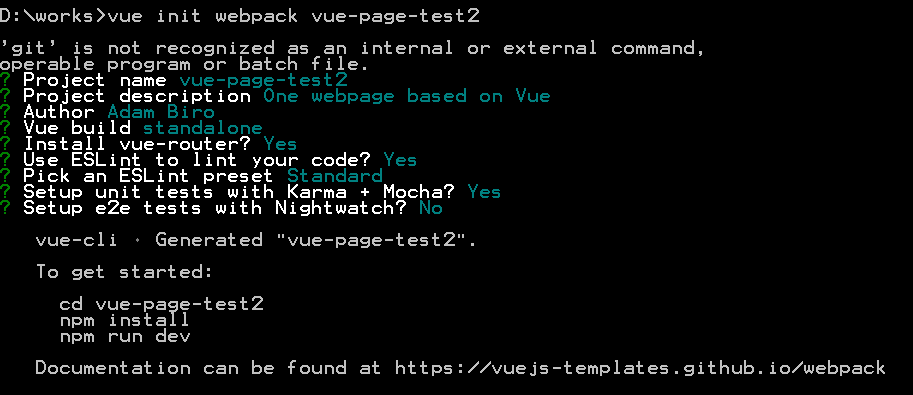
vue init webpack [folder_name]
We could use the webpack-simple command too, but we need the vue-router plugin which is not in the options of the installation process if we are using the simple format of the webpack command. ( In the latter case, we need to install it separately).
We already have the npm and vue-cli on our operating system if you followed the introduction parts of Vue.js series. Now, you should go into the folder which you created previously with the webpack command and run the:
npm install
If the installation is over, you can execute the dev server command which is:
npm run dev
The structure of the initialized app:
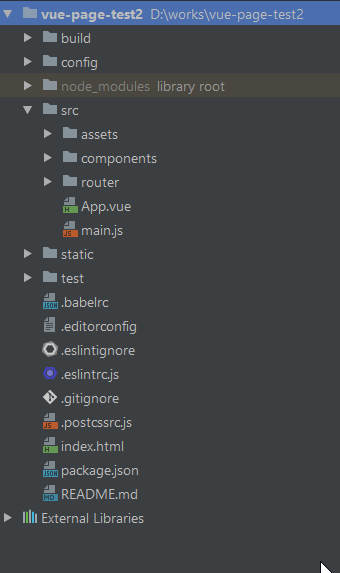
Okay! Now we have everything that we need and you have the folder structure like this below.
Right now we won't start with the deletion of the src folder as we did earlier in the introduction notes. Instead, we only change the files which need some alteration. So let's open the /src/router/index.js file and paste the following code. As you can see on the top, we have three components import. Home, About, Contact. These will be our pages. Lower in the Router section we added a mode: history line. It will help to avoid using the hash mark in the urls. Below that line, we set the name of the components and the path where we will be able to access them in the browser.
import Vue from 'vue'
import Router from 'vue-router'
import Home from '@/components/Home'
import About from '@/components/About'
import Contact from '@/components/Contact'

Vue.use(Router)

export default new Router({
  mode: 'history',
  routes: [
    {
      path: '/',
      name: 'Home',
      component: Home
    },
    {
      path: '/about',
      name: 'About',
      component: About
    },
    {
      path: '/contact',
      name: 'Contact',
      component: Contact
    }
  ]
})
Let's rename the default Hello.vue file to Home.vue and paste the following code into that file. After this, you should create two extra files for the About and Contact pages. (Right now we are using the default CSS in the codes.) See the codes below.
Home.vue
<template>
  <div class="home">
    <h1></h1>
  </div>
</template>

<script>
export default {
  name: 'Home',
  data () {
    return {
      msg: 'Welcome to Your Home page of Vue.js App'
    }
  }
}
</script>

<!-- Add "scoped" attribute to limit CSS to this component only -->
<style scoped>
h1, h2 {
  font-weight: normal;
}

ul {
  list-style-type: none;
  padding: 0;
}

li {
  display: inline-block;
  margin: 0 10px;
}

a {
  color: #42b983;
}
</style>
About.vue
<template>
    <div class="about">
        <h1></h1>
    </div>
</template>

<script>
  export default {
    name: 'About',
    data () {
      return {
        msg: 'Welcome to Your About page of Vue.js App'
      }
    }
  }
</script>

<!-- Add "scoped" attribute to limit CSS to this component only -->
<style scoped>
// Styie is the same as above
</style>
Contact.vue
<template>
    <div class="contact">
        <h1></h1>
    </div>
</template>

<script>
  export default {
    name: 'Contact',
    data () {
      return {
        msg: 'Welcome to Your Contact page of Vue.js App'
      }
    }
  }
</script>

<!-- Add "scoped" attribute to limit CSS to this component only -->
<style scoped>
// Styie is the same as above
</style>
Right now you still can't see anything. Just the logo without the default links. To have something visible we need to change a few lines in the App.vue.
So let's open the App.vue file and replace the image tag with the following lines:
    <router-link v-bind:to="'/'">Home</router-link>
    <router-link v-bind:to="'/about'">About</router-link>
    <router-link v-bind:to="'/contact'">Contact</router-link>
Whoala!


